Unfold the Potential of Galaxy Fold Devices with WindowManager’s Rear Display Mode
Ummey Habiba Bristy
Engineer, Samsung Developer Program
Samsung Galaxy Fold devices have taken the mobile industry by storm, offering users a revolutionary way to interact with their applications. One of their key features is the rear display mode that enables users to continue their tasks seamlessly on the cover display while the main display remains turned off. Jetpack WindowManager has introduced APIs to enable this mode programmatically, and starting from One UI 6.0, developers can now utilize these APIs to integrate rear display mode into their applications, enhancing usability and maximizing the potential of foldable devices.

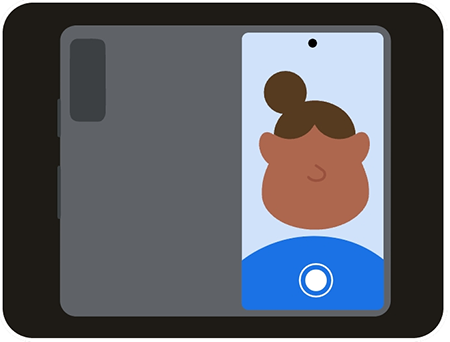
In this blog post, we dive deeper into implementing Jetpack WindowManager's rear display mode in a camera application. By leveraging this mode, users can take selfies with superior image quality using the rear camera instead of the front camera. Join us as we explore the exciting possibilities of foldable technology and uncover how to optimize your applications for the Samsung Galaxy Fold.
You can download the sample camera application here.
Step 1: Add the WindowManager library into the project
WindowManager, a Jetpack library introduced by Google, supports rear display mode starting from version 1.2.0-beta03. To add the WindowManager library, go to Gradle Scripts > build.gradle (Module: app) and enter the following to the dependencies block:
implementation "androidx.window:window:1.3.0"
Step 2: Implement the WindowAreaSessionCallback interface in MainActivity.kt
The WindowAreaSessionCallback interface updates an Activity about when the WindowAreaSession is started and ended. Using the onSessionStarted method, this interface provides the current WindowAreaSession as soon as a new window session is started.
class MainActivity : AppCompatActivity() , WindowAreaSessionCallback {

…

   override fun onSessionEnded(t: Throwable?) {
      if(t != null) {
      println("Something was broken: ${t.message}")
      }
   }
   override fun onSessionStarted(session: WindowAreaSession) {
   }

}
Step 3: Declare variables
The WindowAreaController provides information about the moving windows between the cover display and the main display of the Galaxy Fold device.
The WindowAreaSession interface provides an active window session in the onSessionStarted method.
WindowAreaInfo represents the current state of a window area. It provides a token which is used later to activate rear display mode.
WindowAreaCapability.Status represents the availability and capability status of the window area defined by the WindowAreaInfo object. We utilize this status to change the UI of our application. The status of the Galaxy Fold device can be one of the following:
-
WINDOW_AREA_STATUS_ACTIVE: if the cover display is currently active.
-
WINDOW_AREA_STATUS_AVAILABLE: if the cover display is available to be enabled.
-
WINDOW_AREA_STATUS_UNAVAILABLE: if the cover display is currently not available to be enabled.
-
WINDOW_AREA_STATUS_UNSUPPORTED: if the Galaxy Fold device is running on Android 13 or lower.
private lateinit var windowAreaController: WindowAreaController
private var windowAreaSession: WindowAreaSession? = null
private var windowAreaInfo: WindowAreaInfo? = null
private var capabilityStatus: WindowAreaCapability.Status = WindowAreaCapability.Status.WINDOW_AREA_STATUS_UNSUPPORTED
private val operation = WindowAreaCapability.Operation.OPERATION_TRANSFER_ACTIVITY_TO_AREA
Step 4: Create an instance of WindowAreaController in the onCreate method
windowAreaController = WindowAreaController.getOrCreate()
Step 5: Set up a flow to get information from WindowAreaController
In the onCreate() method, add a lifecycle-aware coroutine to query the list of available WindowAreaInfo objects and their status. The coroutine executes each time the lifecycle starts.
lifecycleScope.launch(Dispatchers.Main) {
   lifecycle.repeatOnLifecycle(Lifecycle.State.STARTED) {
      windowAreaController.windowAreaInfos
         .map { info -> info.firstOrNull { it.type == WindowAreaInfo.Type.TYPE_REAR_FACING } }
         .onEach { info -> windowAreaInfo = info }
         .map { it?.getCapability(operation)?.status ?: WindowAreaCapability.Status.WINDOW_AREA_STATUS_UNSUPPORTED }
         .distinctUntilChanged()
         .collect {
            capabilityStatus = it
            updateUI()
         }
   }
}
Step 6: Update the UI according to the device's WindowAreaCapability.Status
private fun updateUI() {
   if(windowAreaSession != null) {
      viewBinding.switchScreenButton.isEnabled = true
   } else {
      when(capabilityStatus) {
         WindowAreaCapability.Status.WINDOW_AREA_STATUS_UNSUPPORTED -> {
            viewBinding.switchScreenButton.isEnabled = false
            Toast.makeText(baseContext, "RearDisplay is not supported on this device", Toast.LENGTH_SHORT).show()
         }
         WindowAreaCapability.Status.WINDOW_AREA_STATUS_UNAVAILABLE -> {
            viewBinding.switchScreenButton.isEnabled = false
            Toast.makeText(baseContext, "RearDisplay is not currently available", Toast.LENGTH_SHORT).show()
         }
         WindowAreaCapability.Status.WINDOW_AREA_STATUS_AVAILABLE -> {
            viewBinding.switchScreenButton.isEnabled = true
         }
         WindowAreaCapability.Status.WINDOW_AREA_STATUS_ACTIVE -> {
            viewBinding.switchScreenButton.isEnabled = true
            Toast.makeText(baseContext, "RearDisplay is currently active", Toast.LENGTH_SHORT).show()
         }
         else -> {
            viewBinding.switchScreenButton.isEnabled = false
            Toast.makeText(baseContext, "RearDisplay status is unknown", Toast.LENGTH_SHORT).show()
         }
      }
   }
}
Step 7: Toggle to rear display mode with WindowAreaController
Close the session if it is already active, otherwise start a transfer session to move the MainActivity to the window area identified by the token.
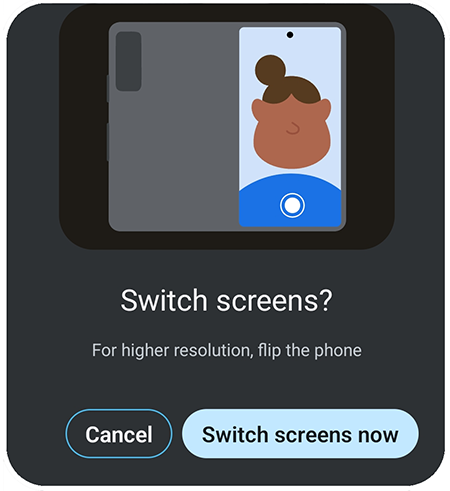
While activating rear display mode, the system creates a dialog to request the user’s permission to allow the application to switch screens. This dialog is not customizable.
private fun toggleRearDisplayMode() {
   if(capabilityStatus == WindowAreaCapability.Status.WINDOW_AREA_STATUS_ACTIVE) {
      if(windowAreaSession == null) {
         windowAreaSession = windowAreaInfo?.getActiveSession(
            operation
         )
      }
      windowAreaSession?.close()
   } else {
      windowAreaInfo?.token?.let { token ->
         windowAreaController.transferActivityToWindowArea(
            token = token,
            activity = this,
            executor = displayExecutor,
            windowAreaSessionCallback = this
         )
      }
   }
}
Step 8: Start the camera preview
Call startCamera() when onSessionStarted is triggered by the WindowAreaSessionCallback interface.
override fun onSessionStarted(session: WindowAreaSession) {
   startCamera()
}
Step 9: Add a button and set a listener to it for activating rear display mode
<Button
   android:id="@+id/switch_screen_button"
   android:layout_width="110dp"
   android:layout_height="110dp"
   android:layout_marginStart="50dp"
   android:elevation="2dp"
   android:text="@string/switch_screen"
   app:layout_constraintBottom_toBottomOf="parent"
   app:layout_constraintBottom_toTopOf="@+id/horizontal_baseline"
   app:layout_constraintStart_toEndOf="@id/vertical_centerline" />
viewBinding.switchScreenButton.setOnClickListener{
   updateUI()
   toggleRearDisplayMode()
}
Incorporating rear display mode into your application can significantly enhance user experience by providing more intuitive control and greater flexibility. By following the outlined steps, you can create a more dynamic and user-friendly interface. As technology continues to evolve, staying ahead with features like rear display mode can set your application apart and offer users a seamless, professional-quality experience. To learn more about developing applications for Galaxy Foldable devices, visit: developer.samsung.com/galaxy-z.


