Implementing "Add to Wallet" in an Android Application
Mobassir Ahsan
Engineer, Samsung Developer Program
Samsung Wallet is a fast and secure digital wallet application bundled with millions of Samsung Galaxy devices worldwide. Its streamlined functionality allows users to add and store various passes, tickets, and credentials all in one place. You can design custom Wallet cards, such as for boarding passes, tickets, coupons, gift cards and loyalty cards, for your service and issue them to users who can add them to the Samsung Wallet application on their device.
Samsung Wallet cards are signed with the RS256 asymmetric algorithm. The RS256 signing algorithm requires a private key, which is a personal credential that must never be shared in the application. Consequently, a separate server application is needed to store the key and sign the Wallet card data (CData).
When the user taps the "Add to Samsung Wallet" button in the application, the server application creates and signs the Wallet card data, then returns a JWT token that is used to add the Wallet card to the user's Samsung Wallet application.

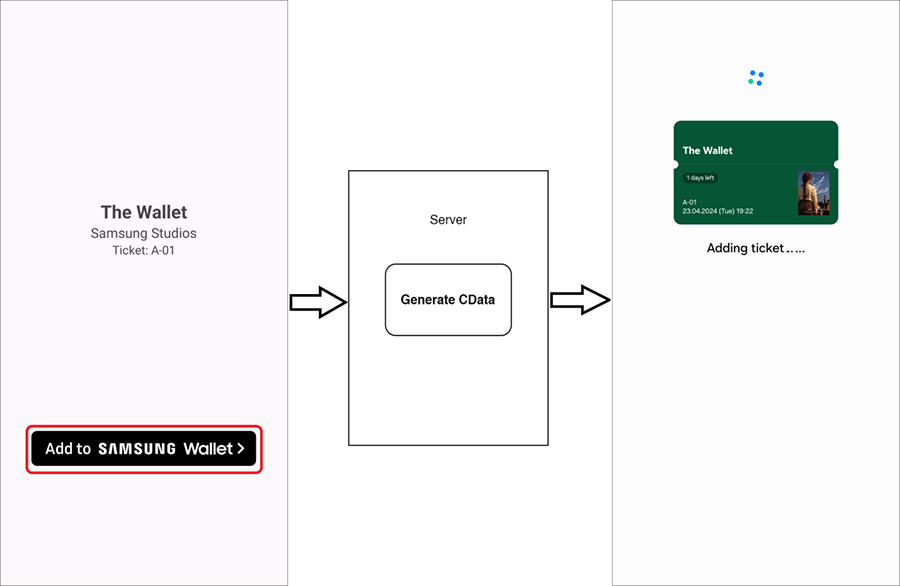
Figure 1: "Add to Wallet" flow
This tutorial uses Kotlin to demonstrate how to implement the "Add to Wallet" feature in an Android mobile application that adds movie tickets to Samsung Wallet. It also shows how to generate the Wallet cards using a Spring Boot server. You can follow along with the tutorial by downloading the sample code files.
Develop the mobile application
To implement the "Add to Wallet" button in the mobile application, you must configure the application, implement the application UI, and define the application logic for the button.
Configuring the mobile application project
Create an application project and configure it to connect to and communicate with the server through REST API requests:
- In Android Studio, create a new project.
- To implement REST API support in the application, add the following Retrofit library dependencies to the application's "build.gradle" file:
'com.squareup.retrofit2:retrofit:2.11.0' 'com.squareup.retrofit2:converter-gson: 2.11.0' - To enable communication with the server, add the following permissions to the "AndroidManifest.xml" file:
<uses-permission android:name="android.permission.INTERNET"/> <uses-permission android:name="android.permission.ACCESS_NETWORK_STATE"/> <uses-permission android:name="android.permission.ACCESS_WIFI_STATE"/> - To enable testing with a local non-HTTPS server, add the following attribute to the "application" element in the "AndroidManifest.xml" file:
android:usesCleartextTraffic="true"
Implementing the application UI
The application UI consists of two screens: the movie tickets list and a ticket detail page.
-
In the application code, define a
Moviedata class that contains details for the movie tickets that can be added to Samsung Wallet.data class Movie( val name:String, val studio:String, val ticketNumber:String, ) -
Create a
RecyclerViewthat displays the list of movie tickets as buttons on the main screen. Each button has a listener that opens the detail page for the ticket. You can study the implementation details in the sample code. -
To check whether the device supports Samsung Wallet, send an HTTP GET request to the following endpoint, where
Build.MODELis the model of the device:https://api-us3.mpay.samsung.com/wallet/cmn/v2.0/device/available?serviceType=WALLET&modelName=${Build.MODEL} -
Create the ticket detail page layout in the "activity_movie_detail.xml" file. The "Add to Wallet" button is implemented on this page.

Figure 2: Detail page layout
Implement the ticket detail page functionality in the
MovieDetailActivityactivity class in the application code.For this demonstration, the movie ticket data is predefined in the application code. In a real application, the data is usually retrieved in real time from an external database.
val movieLists = listOf<Movie>( Movie("The Wallet", "Samsung Studios", "A-01"), Movie("Crying Sea", "Laplace Studio","H-07"), Movie("Canoe", "Terra Productions", "R-03") ) val position:Int = intent.getIntExtra("moviePosition", 0) val movie:Movie = movieLists[position] binding.mvNameText.text = movie.name binding.mvStudioText.text = movie.studio binding.mvTicketNumber.text = "Ticket: ${movie.ticketNumber}" binding.addToWalletButton.setOnClickListener { // Request server to generate card data // Retrieve signed card data from server // Add card to Samsung Wallet application } -
When the user taps the "Add to Wallet" button,
OnClickListener()is triggered. Its functionality is defined later in this tutorial.
Connecting to the server
To communicate with the server:
-
In the
TokenResponseclass, define the structure of the JSON response to be received from the server. Thestatusfield indicates whether the token generation request was successful, and thejwtfield contains the generated CData in the form of a JWT token.data class TokenResponse( val status: String, val jwt:String ) -
In the "ApiClient.kt" file, define a
RetrofitClientobject that is used to establish the connection with the server. -
Define the
ApiInterfaceinterface, which defines the API request and response:-
The API endpoint URL is
BASE_URL/movie/{ID}, where{ID}is the movie ticket ID to be added -
The expected response from the endpoint is a
TokenResponseobject.
-
-
Define an
ApiClientobject that extendsApiInterfaceand creates aRetrofitClientinstance to establish the server connection.object RetrofitClient { private const val BASE_URL = "http://192.xxx.xxx.xxx:8080" // Define your server URL val retrofit: Retrofit by lazy { Retrofit.Builder() .baseUrl(BASE_URL) .addConverterFactory(GsonConverterFactory.create()) .build() } } interface ApiInterface { @GET("/movie/{id}") suspend fun getMovie(@Path("id") movieId:Int): Response<TokenResponse> } object ApiClient { val apiService: ApiInterface by lazy { RetrofitClient.retrofit.create(ApiInterface::class.java) } }
Adding card data to Samsung Wallet
To request CData generation from the server and add the Wallet card to Samsung Wallet:
-
In the
addToWalletButton.setOnClickListener()method within theMovieDetailActivityclass, send a request to the server to generate CData for the selected movie ticket. -
If CData generation is successful, to add the movie ticket to Samsung Wallet, send an HTTP request containing the CData token to the following endpoint URL:
https://a.swallet.link/atw/v1/{Card Id}#Clip?cdata={CData token} -
For more information about this endpoint, see Data Transmit Link.
binding.addToWalletButton.setOnClickListener {
    CoroutineScope(Dispatchers.Main).launch {
        val response = ApiClient.apiService.getMovie(position)
        if(response.isSuccessful && response.body()!=null){
            startActivity(Intent(
                Intent.ACTION_VIEW,
                Uri.parse("http://a.swallet.link/atw/v1/3aabbccddee00#Clip?cdata=${response.body()!!.jwt}")))
// Replace '3aabbccddee00' part with your card ID
        }
    }
}
Generate signed Wallet card data
The server application must be configured to receive the card data request from the mobile application and return a signed JWT token. This part of the tutorial uses the Spring Boot framework.
Configuring the server project
To create and configure a server application to generate and sign Wallet card data:
- In the Spring Initializr tool or any supported Java IDE, create a Spring Boot project and open the sample code.
- To configure the server to receive REST API requests from the mobile application, add the "Spring Web" dependency to the project.
-
Define a
Tokendata class. Make sure it has the same attributes as theTokenResponsedata class defined in the mobile application.data class Token(val status:String, val jwt:String -
Initialize a
TokenControllerclass that receives the incoming requests and returns a Token object in response.@RestController @RequestMapping("movie") class TokenController { @GetMapping(path = ["/{movieId}"]) fun getMovie(@PathVariable movieId:Int): Token { return Token("success", "{DUMMY_CDATA}") // CData generation logic } }The CData generation and signing logic is described in the next section.
Implementing card data signing logic
For easier understanding, this section describes a simplified implementation of the CData Generation Sample Code.
- In the server application project, copy the following credential files to the "sample/securities/" directory.
- Samsung public key from the Samsung certificate ("Samsung.crt")
- Partner public key from your partner certificate ("Partner.crt")
- Partner private key from the private key file ("Partner.key")
- To handle the certificate files and signing algorithms, add the following dependencies to the server application's "build.gradle" file:
implementation 'com.nimbusds:nimbus-jose-jwt:9.37.3' implementation 'org.bouncycastle:bcprov-jdk18on:1.77' -
In a new "JwtGen.kt" file, define a
readCertificate()method that reads the public keys from the certificates and areadPrivateKey()method that reads the private key from the key file.private val PARTNER_ID = "4048012345678912345" // Replace with your partner ID private val samsungPublicKey = readCertificate(getStringFromFile("sample/securities/Samsung.crt")) private val partnerPublicKey = readCertificate(getStringFromFile("sample/securities/Partner.crt")) private val partnerPrivateKey = readPrivateKey(getStringFromFile("sample/securities/Partner.key")) fun readPrivateKey(key: String): PrivateKey { val keyByte = readKeyByte(key) lateinit var privateKey: PrivateKey val pkcs8Spec = PKCS8EncodedKeySpec(keyByte) try { val kf = KeyFactory.getInstance("RSA") privateKey = kf.generatePrivate(pkcs8Spec) } catch (e: InvalidKeySpecException) { e.printStackTrace() } catch (e: NoSuchAlgorithmException) { e.printStackTrace() } return privateKey } fun readCertificate(cert: String): PublicKey { lateinit var certificate: Certificate val keyByte = readKeyByte(cert) val `is`: InputStream = ByteArrayInputStream(keyByte) try { val cf = CertificateFactory.getInstance("X.509") certificate = cf.generateCertificate(`is`) } catch (e: CertificateException) { e.printStackTrace() } return certificate.publicKey } private fun readKeyByte(key: String): ByteArray { val keyByte: ByteArray val bais = ByteArrayInputStream(key.toByteArray(StandardCharsets.UTF_8)) val reader: Reader = InputStreamReader(bais, StandardCharsets.UTF_8) val pemReader = PemReader(reader) var pemObject: PemObject? = null try { pemObject = pemReader.readPemObject() } catch (e: IOException) { e.printStackTrace() } keyByte = if (pemObject == null) { Base64.getDecoder().decode(key) } else { pemObject.content } return keyByte } fun getStringFromFile(path: String?): String { try { val file = File(Objects.requireNonNull(ClassLoader.getSystemClassLoader().getResource(path)).file) return String(Files.readAllBytes(file.toPath())) } catch (e: IOException) { throw RuntimeException(e) } }
Generating card data
CData token generation is implemented in the "JwtGen.kt" file:
- Read the file containing raw JSON data that defines the ticket data structure.
For this demonstration, use the "Ticket.json" file in the "sample/payload/" directory of the CData generation sample code.
- Generate or fill in the required ticket details. For example, the "{title}" and "{seatNumber}" fields are replaced with the movie title and seat number.
For information about the complete JSON structure, see Wallet Cards.
- Convert the JSON data to a JWE object.
- Encrypt the JWE object with the Samsung public key.
- Build the custom JWS header for Samsung Wallet cards.
- Sign and validate the complete JWS object with your partner private and public key using the RS256 asymmetric algorithm. This is the CData token.
private val currentTimeMillis = System.currentTimeMillis()

private val plainData:String = getStringFromFile("sample/payload/Ticket.json")
    .replace("{refId}", UUID.randomUUID().toString())
    .replace("{language}", "en")
    .replace("{createdAt}", currentTimeMillis.toString())
    .replace("{updatedAt}", currentTimeMillis.toString())
    .replace("{issueDate}", currentTimeMillis.toString())
    .replace("{startDate}", (currentTimeMillis + TimeUnit.DAYS.toMillis(1)).toString())
    .replace("{endDate}", (currentTimeMillis + TimeUnit.DAYS.toMillis(1) + +TimeUnit.HOURS.toMillis(2)).toString())

fun generateCdata(movieName: String, movieTicktNo:String): String{
    // Modify data as needed
    val data = plainData.replace("{title}", "\"$movieName\"")
        .replace("{seatNumber}","\"$movieTicktNo\"")

    //print(data)

    return generate(PARTNER_ID, samsungPublicKey, partnerPublicKey, partnerPrivateKey, data)
}

private fun generate(partnerId: String, samsungPublicKey: PublicKey, partnerPublicKey: PublicKey,
                     partnerPrivateKey: PrivateKey, data: String): String {
    val jweEnc = EncryptionMethod.A128GCM
    val jweAlg = JWEAlgorithm.RSA1_5
    val jweHeader = JWEHeader.Builder(jweAlg, jweEnc).build()
    val encryptor = RSAEncrypter(samsungPublicKey as RSAPublicKey)
    val jwe = JWEObject(jweHeader, Payload(data))
    try {
        jwe.encrypt(encryptor)
    } catch (e: JOSEException) {
        e.printStackTrace()
    }
    val payload = jwe.serialize()

    val jwsAlg = JWSAlgorithm.RS256
    val utc = System.currentTimeMillis()

    val jwsHeader = JWSHeader.Builder(jwsAlg)
        .contentType("CARD")
        .customParam("partnerId", partnerId)
        .customParam("ver", "2")
        .customParam("utc", utc)
        .build()

    val jwsObj = JWSObject(jwsHeader, Payload(payload))

    val rsaJWK = RSAKey.Builder(partnerPublicKey as RSAPublicKey)
        .privateKey(partnerPrivateKey)
        .build()

    val signer: JWSSigner
    try {
        signer = RSASSASigner(rsaJWK)
        jwsObj.sign(signer)
    } catch (e: JOSEException) {
        e.printStackTrace()
    }
    return jwsObj.serialize()
}
Returning the signed token
In the server application code, when the server receives a request at the movie/{movieID} endpoint, the TokenController class calls the JwtGen.generateCdata() method with the movie ID, which generates and returns the CData JWT token in the API response.
In this tutorial, since the movie ticket list was predefined in the mobile application project, make sure the same Movie data class and list are defined here too.
@RestController
@RequestMapping("movie")
class TokenController {
    @GetMapping(path = ["/{movieId}"])
    fun getMovie(@PathVariable movieId:Int): Token {
        val movieLists = listOf<Movie>(
            Movie("The Wallet", "Samsung Studios", "A-01"),
            Movie("Crying Sea", "Laplace Studio","H-07"),
            Movie("Canoe", "Terra Productions", "R-03")
        )

        if( movieId>2){
            // Implement your verification logic
            return Token("failure", "")
        }
        else{
            val cdata = JwtGen.generateCdata(movieLists[movieId].name, movieLists[movieId].ticketNumber)
            return Token("success", cdata)
        }
    }
}
Testing the application
To test your "Add to Wallet" integration:
- Connect the server and the mobile device to the same network.
- Launch the server and mobile applications.
- In the mobile application, tap a movie ticket in the list. Its detail page opens.
- Tap Add to Samsung Wallet. The server generates and returns the CData token.
- The Samsung Wallet application launches on the device and the movie ticket information is added to it.
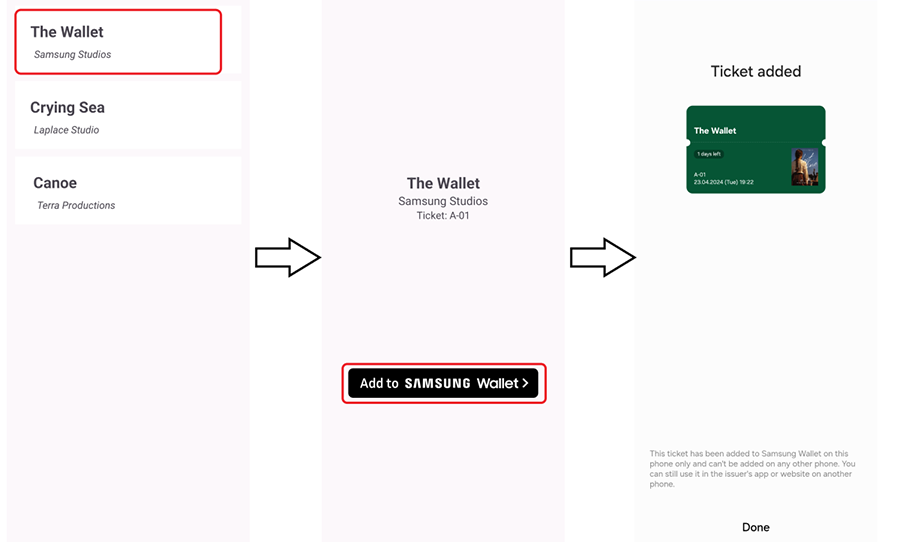
Figure 3: Ticket added to Samsung Wallet
Summary
Implementing the "Add to Wallet" feature enables your users to add your digital content, such as tickets, passes, and loyalty cards, to the Samsung Wallet application on their mobile device as Wallet cards. In addition to implementing the "Add to Samsung Wallet" button in your mobile application, you must also create a server application that securely generates and signs the Wallet card data and returns it to the mobile application for transmitting to Samsung Wallet.
For more information about adding "Add to Wallet" to your application, see Implementing ATW button. You can also study the extended sample application (clicking this link downloads the sample code) and the API reference.
If you have questions about or need help with the information presented in this article, you can share your queries on the Samsung Developers Forum. You can also contact us directly for more specialized support through the Samsung Developer Support Portal.
Resources
Click the links below to download the sample code.


